Build Your Article Style
The hard technical work is done! Let’s lay out our article style.
Heads Up!
This tutorial was written for the v0.6 version of Phosis. Later versions tweaked the user interface for data field mapping. While the screenshots won’t match the current user interface, the concepts are the same!
Create an Article Style
- In the top left, click and then .
- Give it a title, such as “Tutorial: Article Layout.”
- In the Content Blocks Editor below, click .
- Choose “Tutorial: 2 Column Layout With Form.”
Once you do this, you’ll see the containers you defined appear, ready for configuration!
Configure the Article Content container
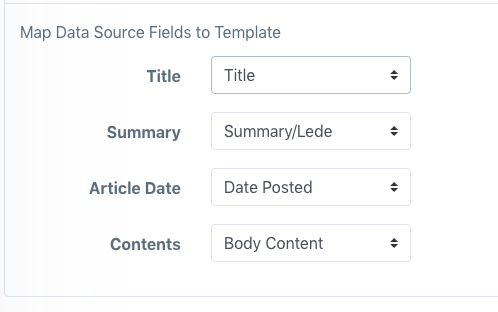
- For the Contents, choose Template and then Tutorial: Article Content, as this is the 1st column of the layout.
- Choose Self as the data source.
- You’ll see the template objects we defined previously appear, with dropdowns to map them to the article’s data.
- Map them using the dropdowns as shown in this screenshot:
- Because we used Self as the data source, the “Display how many” option will be ignored.
Next, choose your form.
Configure the Form container
- For its Contents, choose Form and then the form you created on the previous page, such as Form: Tutorial Form.
… there is no step 2, as the form was configured previously! Now, onto the “other articles” column.
Configure the Other Articles container
This container becomes more useful if we have multiple articles posted, which we’ll do as a part of this quickstart. Let’s set it up:
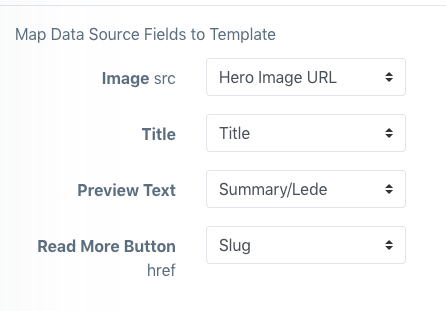
- For Contents, choose Template and then Tutorial: Article Preview Card.
- Choose Articles as the data source.
- You’ll see the template objects we defined previously appear, with dropdowns to map them to the article’s data.
- Map them using the dropdowns as shown in this screenshot:
- In Options & Filters, determine how many article preview cards you’d like to attempt to display. Phosis Render will simply repeat the template for each article it’s loaded up to the quantity you specify.
- Choose how you’d like the articles selected for this container to be ordered; usually, if it’s a “Most Recent Articles” scenario, you’d order by Date Posted and check the Descending checkbox. For our purposes, we’ll set it to Random.
You’ve set up what you needed. Finally, Save Changes on this article style!