Files & Media
Phosis’s Files and Media section lets you upload files to and serve files from IBM’s cloud-powered CDN (content delivery network).
This tool also can appear in a popup window when trying to do certain things on other pages, like selecting a file for a Custom Data entry or choosing a Hero image for an article.
Here are the parts of the Files & Media user interface:
Toolbar
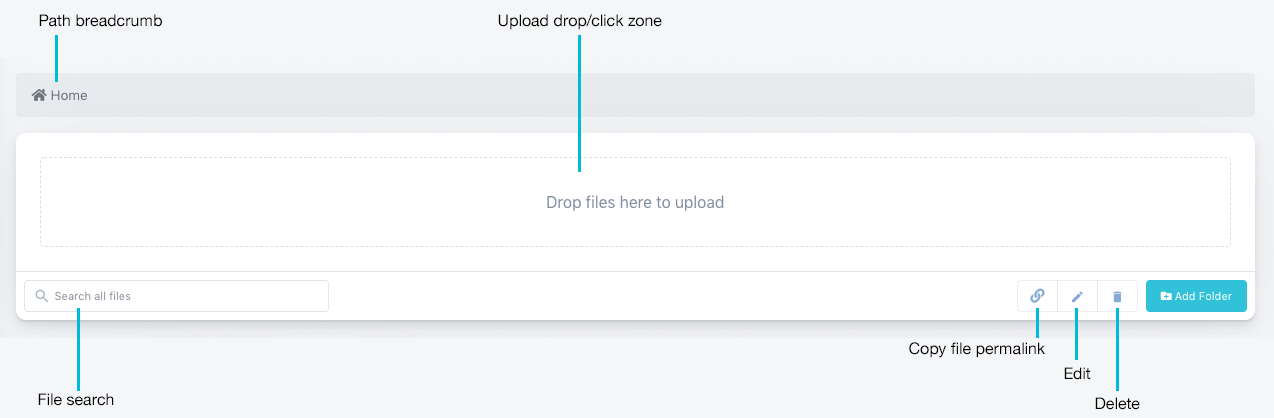
1. Path breadcrumb
This shows you the current folder you’re in as well as any parent folders.
2. Upload drop/click zone
You can drag & drop files into this zone to upload into the current folder, or click the zone to bring up your browser’s file selection window.
Uploading Multiple Files/Folders
At present, you can upload single or multiple files into a folder in Phosis by dragging & dropping into the upload box, but you can’t upload folders. So, if you need to upload everything inside a folder on your hard drive, you should add a folder in Phosis, double-click to open it, then drag and drop the contents of your folder into Phosis’s uploader.
3. Search bar
Type here and press Enter to search all of your files & folders.
4. Action buttons
These buttons are fairly self-explanatory, except for sharing. Some buttons are only available if you are a system admin.
- Copy file permalink (only for single files) — Copy the currently-selected file’s permanent URL to the clipboard.
- Download file - Downloads the currently selected file.
- Edit (only for single files or folders) — Currently allows you to rename a file or folder, but future enhancements will give you text editing capabilities for certain file types.
v1.0 - Share - See below.
- Delete — Deletes the currently-selected items.
- Add Folder — Add a new folder within the current folder.
The “Share” button
If you are a system admin, you have the ability to share a folder or file within Phosis among all sites in your system. Clicking this will make the selected file/folder visible and available to all sites within your local system and all of their Phosis users.
A handy use case for this is to enable shared CSS or Javascript files so that you can update several sites’ design or functionality by only updating files in one location. While you can mimic this behavior by just using the “primary” site’s resource URLs, sharing is going to enable more features in the future such as password- or login-gated files across multiple sitesv1.0 — so we encourage thinking in terms of sharing actual files.
Know Who Owns What’s Shared
It’s really important to remember which site was the original owner of the shared folder or files, and be working in that same site when when uploading new versions to overwrite the old. If you don’t do so and upload the files while you’re editing a different site, you may encounter issues with the files no longer being properly shared!
We’re working out how best to make this clear to users, but sharing is a bleeding-edge Phosis feature right now. So… be mindful!
Content area
Below the toolbar are the files & folders that are in the current folder. You can drag and drop files or folders into folders.
Folders
Folders are ways of organizing files & folders in Phosis. You double-click on a folder to open it and load its contents.
In the future…
We have some plans for how folders can be used down the road, so it’s best if you start organizing your files & media into folders from now.
The /sitefiles Virtual Folder
Every site has a special “virtual” folder called /sitefiles. When you upload files into the /sitefiles virtual folder, they’re accessible as if they were inside an actual folder in the root of your site. So, for example, if you upload a file named logo.png into /sitefiles, you can use it in your templates under the address /sitefiles/logo.png, and Phosis will automatically map it for you.
You can also create subfolders inside of the /sitefiles virtual folder, such as css, js, img, etc., and upload files into those folders. The virtual address would then be able to use your folders, helping keep your Files & Media tidy!
Or, you can upload files anywhere else and copy their permalink. It’s really up to you.
We generally recommend uploading common site assets (Javascripts, CSS, logos, icons, etc.) into /sitefiles, and then images and other files used on specific pages outside of /sitefiles. But that’s not a hard and fast rule at all!
Files area
The files area shows you thumbnail previews of your files when possible or an icon indicating the filetype, along with some relevant information. More functionality is in the works for Files in Phosis.
File Downloads
Append /dl to the end of any Phosis file URL to invoke a download in the user’s browser, like:
<a href="https://your-site-domain.com/files/i/1234/1234.pdf/dl">Download File</a>
File Types
Phosis can accept pretty much any type of file, but be aware that the upload process isn’t chunked or resumable at this time – so you may have problems uploading large files, depending on the reliability and speed of your internet connection.
sitemap.xml and robots.txt
While automatic sitemap generation is on the roadmap, we also added some convenience features in the meantime.
Because search engines like to see robots.txt in the root of the site rather than on a CDN, and it’s more convenient for sitemap.xml to be there as well, you can upload these files anywhere in your site’s folder structure. When Phosis Render sees a request to either of those files directly, it will search your site’s files to find the relevant entry and proxy its contents into your site as if it were stored locally.